Installation
All SimpleRisk Extras are made available through the SimpleRisk services feature, which is automatically activated when you register your SimpleRisk instance. To initiate the registration process, navigate to Configure 🡪 Register & Upgrade. Here, you will need to input your organization’s details and save the information. This action will generate a unique instance ID for your SimpleRisk setup and establish a connection with our servers to create a services API key. Once your instance is successfully registered, SimpleRisk will automatically download and install the Upgrade Extra for you. This Upgrade Extra includes convenient buttons for upgrading the application, backing up your data, and installing additional Extras. If you encounter any issues, please verify that the “simplerisk” directory has write permissions for the web server user (usually “www-data”). Additionally, if your system operates behind a dynamic NAT pool, you may need to reach out to our support team to remove the IP restrictions for your instance.
Activation
This next step is what tells Simplerisk that the Import-Export Extra is installed and ready to use. Log in to your Simplerisk instance and select “Configure” from the Navigation Menu on the left. Then, select “Extras” from the Configuration Menu. You will see a list here of each of the Extras that are available for purchase. Find the row for the “Import/Export” Extra and click where it says “No” in the enabled column. Click on the “ACTIVATE” button. Once activated, you will be redirected to a newly activated “Import/Export” Menu under the Configuration Menu on the left.
Features
Under the newly activated “Import/Export” menu you will see four sections:
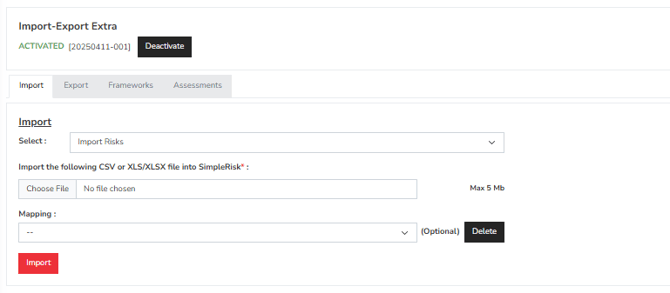
Import
To begin the import process, click on the “Browse” button to locate and select a CSV file from your computer that contains the risks you wish to import. Once you have chosen the file, proceed by clicking the “Import” button. The system will analyze the first line of the file and present a row for each column found in the imported data. Each row will feature a dropdown menu that lists the various risk-related fields available in the SimpleRisk database. During the import, any unspecified fields will be filled with default values, with the subject field being the only mandatory requirement.
Here are the different import options available:
-
Import Risks: This option enables you to import risks into SimpleRisk using a CSV file, requiring you to map the relevant data accordingly.
-
Import Assets: Use this to import assets into SimpleRisk via a CSV file.
-
Import Asset Groups: This allows for the import of asset groups into SimpleRisk through a CSV file.
-
Import Controls: You can import controls into SimpleRisk using a CSV file.
-
Import Users: This feature allows you to import users into SimpleRisk via a CSV file.
-
Import Template Groups: This option enables you to import template groups into SimpleRisk using a CSV file.
-
Import Control Tests: This allows you to import control tests into SimpleRisk via a CSV file.
At the top of the import interface, you will find a checkbox labeled “Import First Row.” If the first row of your CSV file serves as a header and you do not want to create a risk from it, keep this box unchecked. If the first row contains an actual risk you wish to import, be sure to check the box. After mapping the fields in your file to the corresponding fields in SimpleRisk, click the “Import” button. You will then see a summary list of all subjects and risk IDs that were created during the import process.
Export
The “Export” section enables you to export your SimpleRisk data in several different formats:
-
Export Risks: Generates a CSV file containing all risks in the system, along with all associated data fields.
-
Export Mitigations: Generates a CSV file containing all mitigations in the system.
-
Export Reviews: Generates a CSV file containing all reviews in the system.
-
Export Combined: Generates a CSV file that includes risks, their associated mitigations, and their associated reviews. Because a single risk can have multiple reviews, only the most recent review for each risk is included.
-
Export Assets: Generates a CSV file containing all assets in the system.
-
Export Asset Groups: Generates a CSV file containing all asset groups in the system.
-
Export Controls: Generates a CSV file containing all controls that have been added to the system.
-
Export Users: Generates a CSV file containing all users in the system, along with their details.
-
Export Template Groups: Generates a CSV file containing all template groups in the system.
-
Export Control Tests: Generates a CSV file containing all tests associated with controls in the system.
Frameworks
This section showcases all the default frameworks that come with Simplerisk. You can easily install any of these by clicking the “install” button located next to each framework. Please note that these frameworks are distinct from those provided through Compliance SecureForge (SCF).
Assessments
This section showcases all the default assessments offered in Simplerisk. To install any of these assessments, simply click the “install” button located next to each option. Please note that these assessments are distinct from the self-assessments.
Summary
This guide has covered the configuration, installation, and management of the Import-Export Extra. If you still have questions or something is not functioning as expected, please contact us at: support@simplerisk.com