
Requires: Vulnerability Management Extra
Scanner integrations, scheduled syncs with live run monitoring, and automatic triage of high-scoring findings live in the Vulnerability Management Extra. Core SimpleRisk already has the Vulnerabilities list, scanner-file imports and manual triage; see Importing Scanner Exports.
Why this matters
Core SimpleRisk can already take a scanner export, show each vulnerability once across every asset it affects, and triage it into a risk. What it can't do is fetch the export. Somebody has to log in to the scanner, run the export, and import the file, every week or every month, forever. The Vulnerability Management Extra does that part: it connects to the scanner, syncs its findings on a schedule you choose, and puts them in the same Vulnerabilities list as imported files, labeled with the scanner's name. Triage is the same click whether a finding was imported or synced.
A sync also knows something an imported file can't: which scan found which vulnerability on which asset. A file is a snapshot of an unknown slice of the environment, so SimpleRisk never treats something missing from a file as fixed. The integrations work from the scanner's own record instead. And the Extra can triage the loudest findings automatically, which Core never does. A program with one scanner and a monthly export can live on imports; a program with three scanners producing thousands of findings a month can't.
The other reason this matters: the Extra is the integration point with the scanners customers already operate. SimpleRisk doesn't try to be a scanner; it integrates with the scanners that are scanners. If your environment already runs Qualys, Rapid7, or Tenable, the Extra meets your data where it already lives rather than asking the program to switch tools.
Before you start
Have these in hand before activating the Extra:
- Admin access to your SimpleRisk installation to activate the Extra, plus the Vulnerability Management permissions for the work that follows: Allow Access to Vulnerability Management "Configure" Menu for setup, Allow Access to Vulnerability Management "Vulnerabilities" Menu for the list, Able to Approve Vulnerability Triage to Risk to triage findings into risks, and Able to Reject Vulnerability Triage to Risk to hide them. These permissions are part of Core, so they exist before the Extra is activated, but only administrators are granted them automatically. Grant them to everyone else's roles yourself. Scanner configuration (sensitive: it holds API credentials) is gated separately from triage work (routine review) on purpose. (See Permission Reference.)
- An active subscription for the Extra and a registered SimpleRisk install. The Extra is a paid add-on; activation requires the installation to be registered and the Extra to be licensed.
- Scanner platform credentials. The Extra supports five platforms: Qualys, Rapid7 InsightVM Cloud, Rapid7 InsightVM On-Premise, Rapid7 Nexpose, and Tenable.io. For each platform you'll integrate, gather the API URL and the API key (or username/password depending on the platform). The credentials are stored encrypted when the Encrypted Database Extra is active, and as entered otherwise.
- Network connectivity from the SimpleRisk server to the scanner's API endpoint. Cloud scanners (Qualys, Tenable.io, Rapid7 InsightVM Cloud) need outbound HTTPS to the vendor's cloud; on-premise scanners (Rapid7 InsightVM, Nexpose) need network reachability between the SimpleRisk server and the scanner appliance. Air-gapped or heavily-firewalled environments may need additional plumbing.
- A read on your scanner site / scope structure. Most scanners organize work by "site" or "scope" — a named bundle of assets to scan. The Extra picks up data per-site; decide which sites you want SimpleRisk to consume before running the configuration.
Step-by-step
1. Activate the Extra
Before activation, administrators and users with Allow Access to Vulnerability Management "Configure" Menu already see a VM settings entry with a lock icon under Vulnerabilities in the sidebar. It opens the settings page dimmed and read-only, with every scanner shown as Not Connected, under a banner describing what the Extra adds. The banner holds Activate when the Extra is installed, a note that the Extra is required when it isn't, and Learn more. A user who holds that permission but isn't an administrator sees the same preview with "An administrator can set this up," because only an administrator can activate an Extra.
To activate, select Activate on that page, or open the Settings Hub from the Settings cog (top-right of any page), click the Extras chip to filter to Extras tiles, find Vulnerability Management Extra, and click Activate. Activation sets the extra_vulnmgmt configuration setting to true, and the VM settings entry loses its lock and opens the real settings page at /admin/vulnmgmt.php. Platform selection, credentials, import thresholds, the sync schedule and the sync log are all on that one page.
2. Pick the scanner platform(s) to integrate
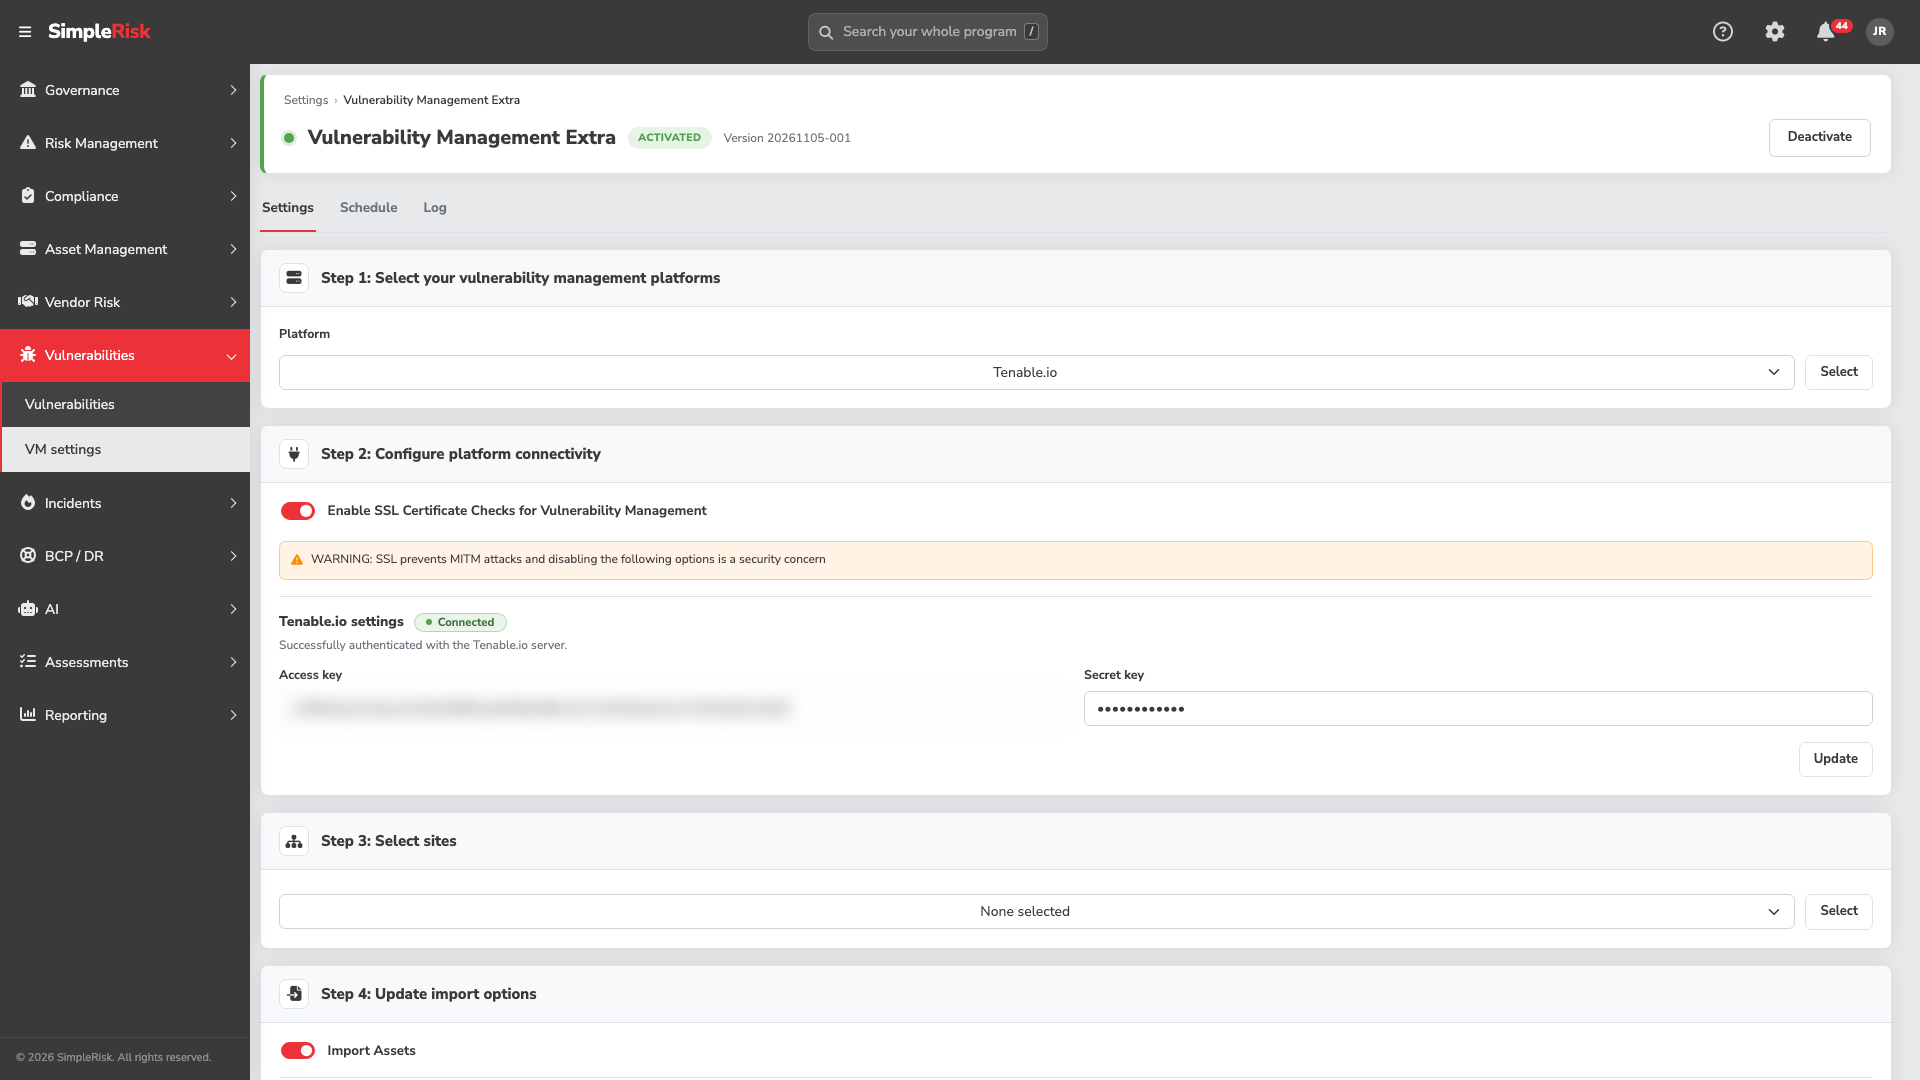
Sidebar: Vulnerabilities → VM settings (the page at /admin/vulnmgmt.php). With the Extra active, the page renders the inlined configuration UI across Settings, Schedule, and Log tabs. The Settings tab opens on Step 1: Select your vulnerability management platforms. Open the Platform list to see the supported platforms:
- Qualys
- Rapid7 InsightVM Cloud
- Rapid7 InsightVM On-Premise
- Rapid7 Nexpose
- Tenable.io
Tick the platforms you'll integrate and click Select. Each enabled platform writes a extra_vulnmgmt_{platform} configuration setting (e.g., extra_vulnmgmt_tenable) that gates the platform's UI and data flow.
You can enable multiple platforms simultaneously — programs running multiple scanners (e.g., Tenable for infrastructure scanning, Qualys for web-app scanning) integrate both, and the Vulnerabilities list shows findings from every enabled platform together, each labeled with its source.
3. Configure platform connectivity
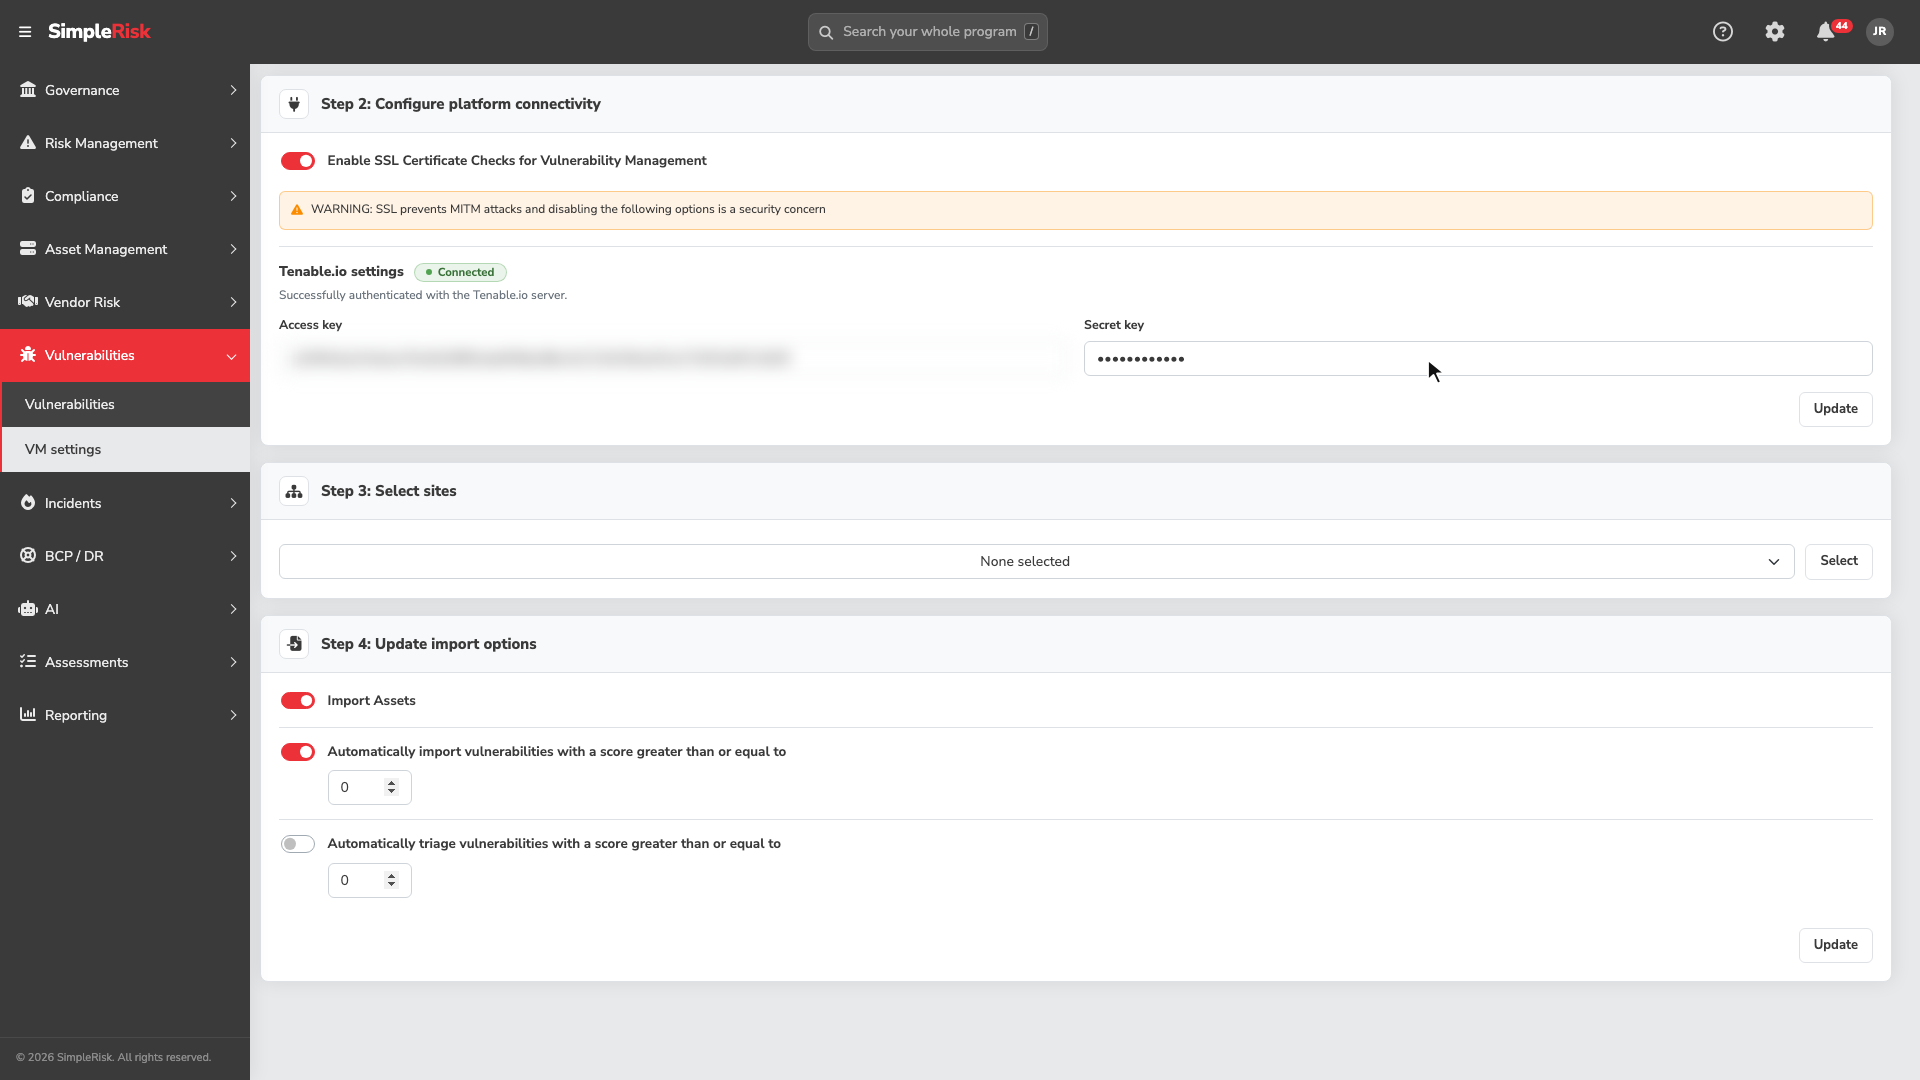
Step 2: Configure platform connectivity has a settings block for each enabled platform, and each platform asks for what its scanner needs:
- Tenable.io takes an Access key and a Secret key. The Tenable.io address is built in, so there's no URL to enter.
- Rapid7 InsightVM Cloud takes an API key and a region.
- Rapid7 InsightVM On-Premise and Rapid7 Nexpose take the console's server name, port, user, and password.
- Qualys takes the Qualys platform, a username, and a password.
Enter the values and click Update. The credentials are stored encrypted when the Encrypted Database Extra is active, and as entered otherwise. After you save, secret values show as a row of dots and SimpleRisk doesn't display them again.
Above the platform blocks, the Enable SSL Certificate Checks for Vulnerability Management switch (the extra_vulnmgmt_ssl_certificate_check setting) controls certificate validation. When it's on, the Extra validates the scanner's TLS certificate. When it's off, it accepts self-signed or otherwise unverifiable certificates. Leave it on for cloud scanners and properly certified internal scanners, and turn it off only in development or testing environments where TLS isn't fully configured.
There's no separate test button. Once the credentials work, the platform's block shows a green Connected badge and a message such as "Successfully authenticated with the Tenable.io server."
4. Pick the sites/scopes to import
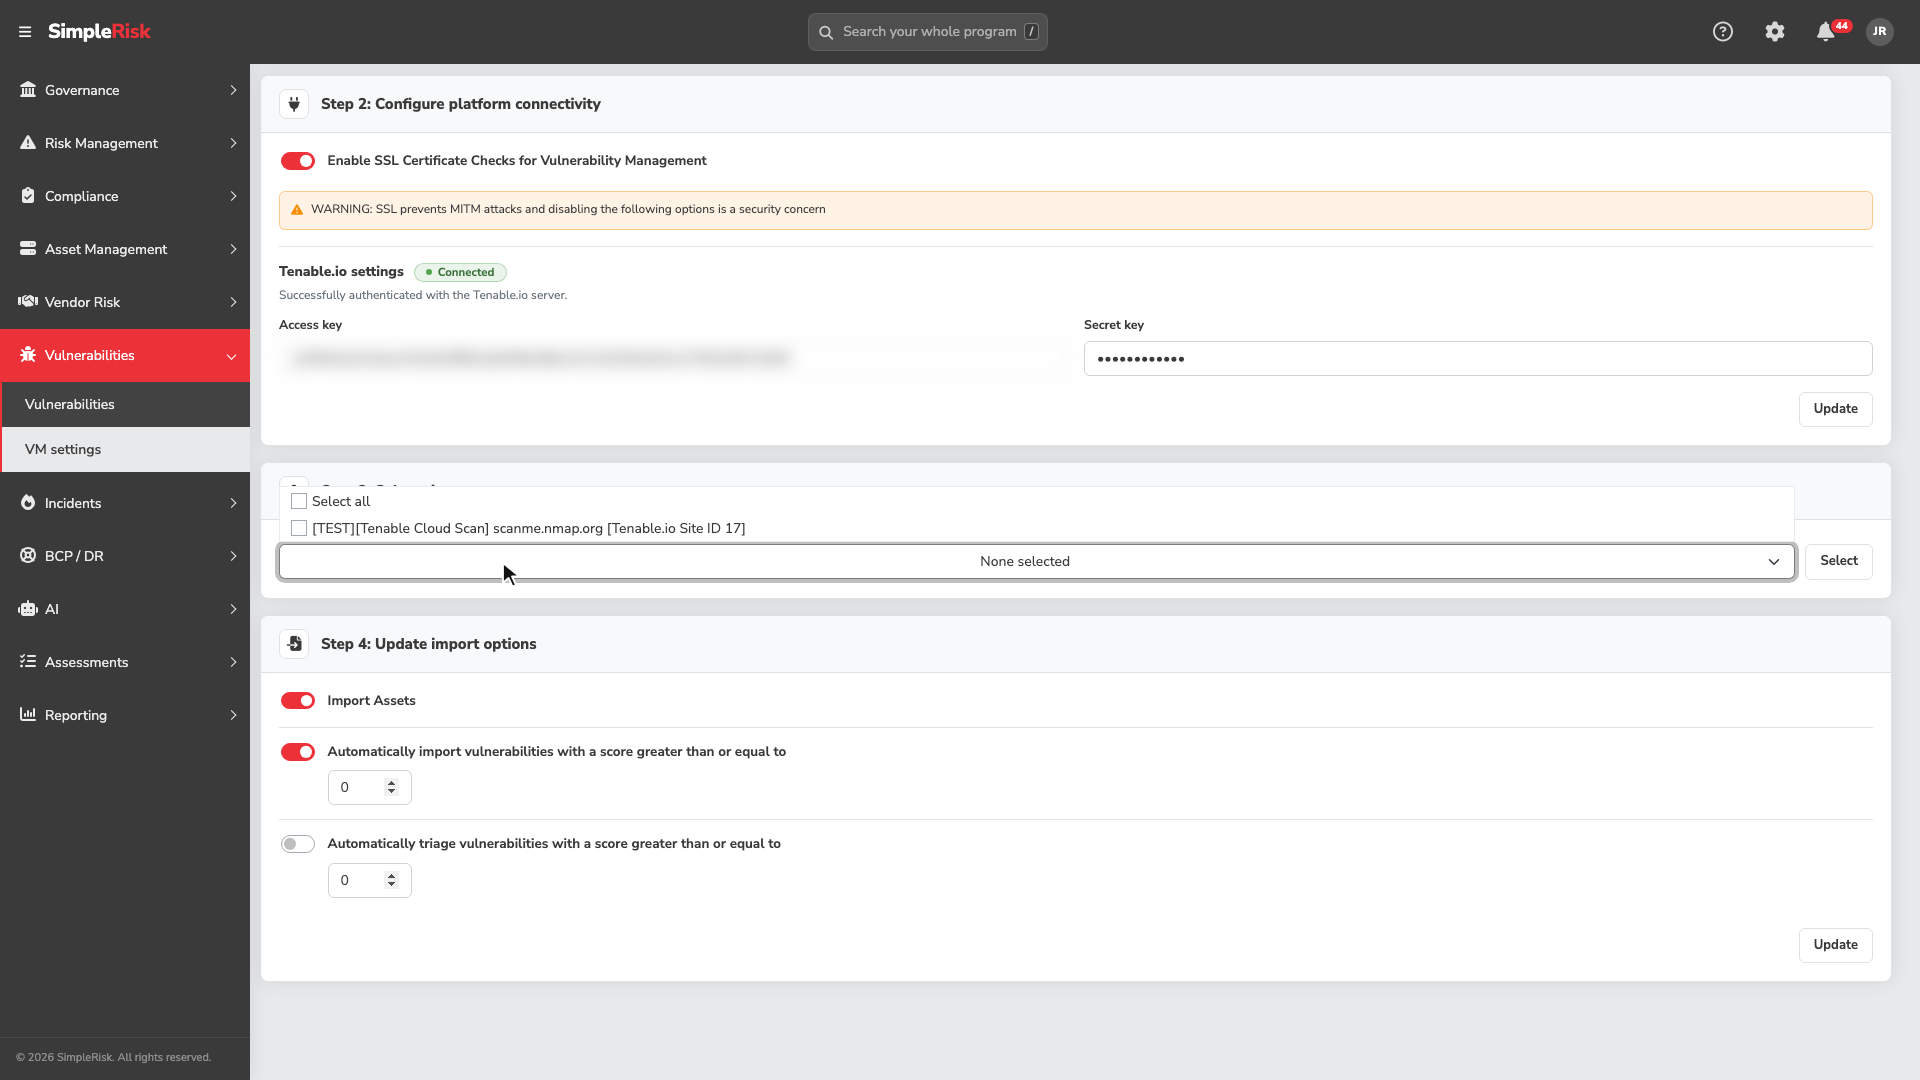
Once the platform connects, Step 3: Select sites lets you pick which sites or scopes SimpleRisk should consume. The Extra calls the scanner's API to list what's available, and you open the list, tick the ones you want vulnerability data from, and click Select. For Tenable.io, each completed scan appears as a site, named with the scan's name and its Tenable.io ID.
For programs running many sites in their scanner, picking only the sites that matter to SimpleRisk's audience reduces noise and improves sync performance. Sites you don't pick stay in the scanner's own console; SimpleRisk just doesn't receive their data.
5. Set the import and triage thresholds
Step 4: Update import options controls what the Extra ingests and what it auto-promotes. The relevant configuration settings:
extra_vulnmgmt_import_assets— when on, the Extra creates SimpleRisk asset records for the assets the scanner has discovered (so the asset linkage on imported vulnerabilities resolves to real asset rows). When off, scanner-discovered assets aren't created and the asset linkage is incomplete. Most programs leave this on.extra_vulnmgmt_import_vulnerabilities_by_score+extra_vulnmgmt_import_vulnerabilities_by_score_value— the import-side filter. When the toggle is on, only vulnerabilities with CVSS scores at or above the configured threshold are ingested. Useful for high-volume scanners where you don't want every Low and Informational finding cluttering the database. The threshold is a CVSS score from 0.0 to 10.0; common values are 4.0 (Medium and above) or 7.0 (High and above).extra_vulnmgmt_triage_vulnerabilities_by_score+extra_vulnmgmt_triage_vulnerabilities_by_score_value— the auto-triage-side filter. When the toggle is on, vulnerabilities at or above the configured threshold are automatically converted to risks during the import cycle, without human review. Common value: 9.0 (Critical only). Setting this lower than 9.0 is risky; the auto-promotion produces risks the team didn't review, and at low thresholds it can flood the risk register.
The two thresholds work together: import filters what enters SimpleRisk at all; auto-triage filters what gets immediately promoted. A typical setup is "import everything CVSS 4.0+, auto-triage CVSS 9.0+, manually triage everything in between."
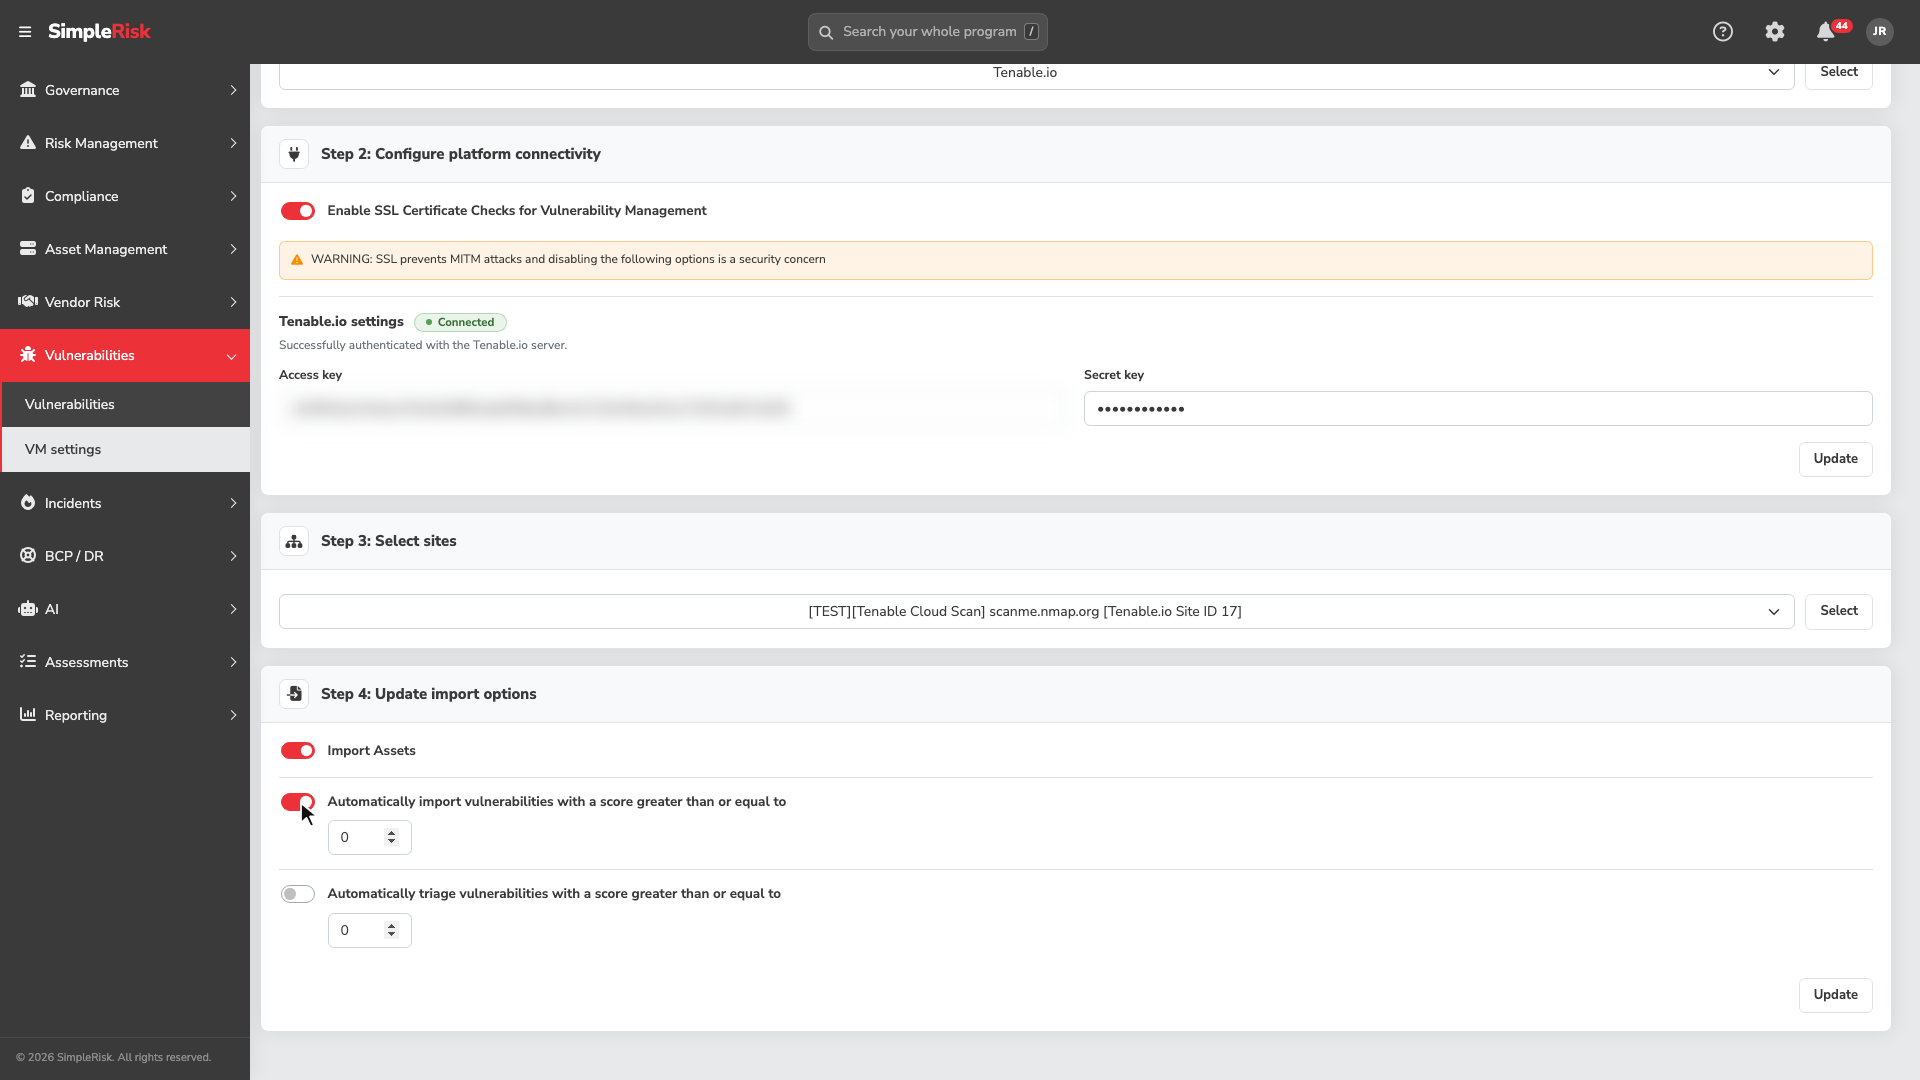
Both thresholds (on the page they read Automatically import vulnerabilities with a score greater than or equal to and Automatically triage vulnerabilities with a score greater than or equal to) compare the finding's best score: the base score of the newest CVSS version the scanner reports for it, in the order v4.0, v3.1, v3.0, v2.0. A finding with a v2 and a v3 score is judged on the v3 score, and a finding the scanner scores only under CVSS v3 is judged on that. Older releases compared only the CVSS v2 score, so findings without one never passed either threshold, and findings whose v3 score cleared a threshold their v2 score missed were held back too. A finding imported before the upgrade keeps being judged on its old score until the next sync refreshes it.
Qualys works a little differently, because Qualys rates findings by severity (1 to 5) rather than by CVSS. SimpleRisk reads the CVSS vectors and base scores from the Qualys KnowledgeBase entry for each vulnerability, and the thresholds use the newest CVSS base score when there is one. Without CVSS data they fall back to severity × 2, as before. One limit to know: SimpleRisk fetches each Qualys vulnerability's KnowledgeBase entry once and keeps it, so CVSS data is only available for vulnerabilities it looks up for the first time after the upgrade. Vulnerabilities it already knew about keep their severity-based score.
6. Schedule the sync and run it on demand
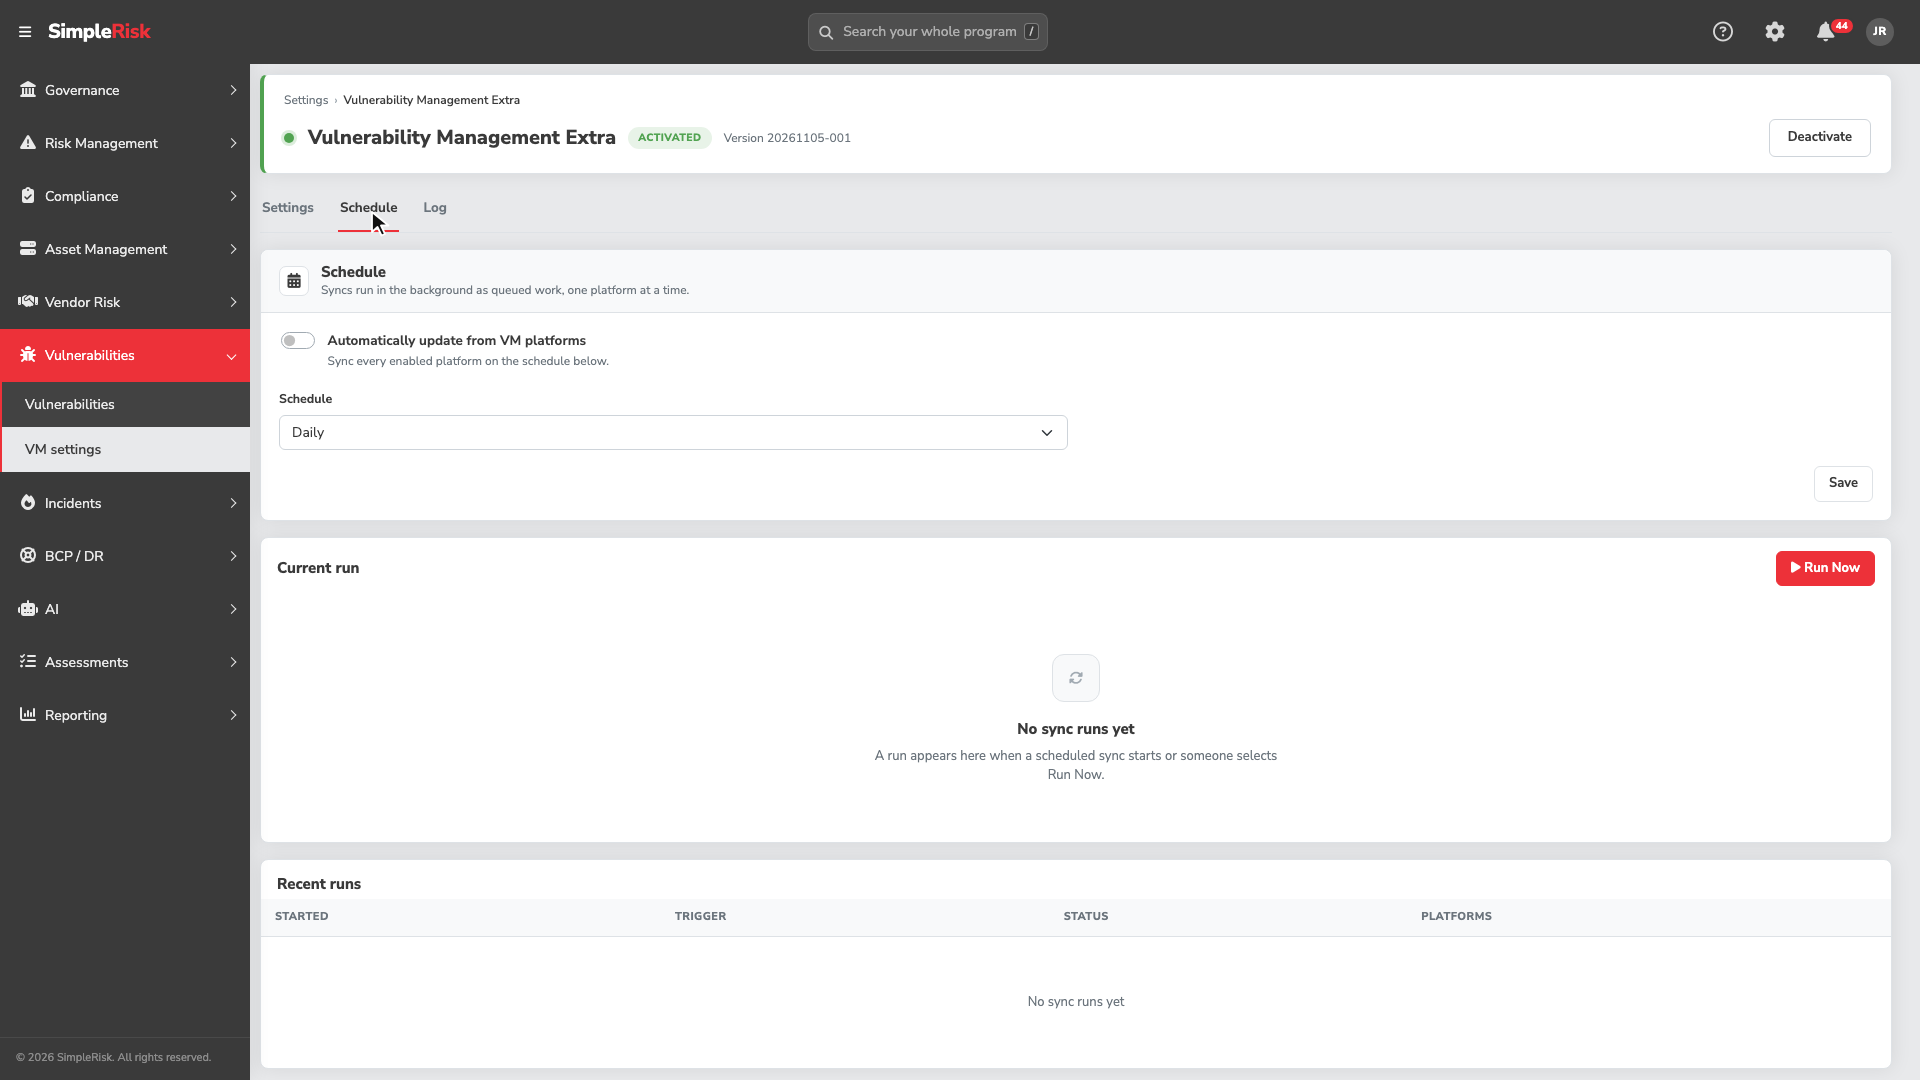
Open the Schedule tab of /admin/vulnmgmt.php. The form at the top has two controls:
- Automatically update from VM platforms — when on, every enabled platform syncs on the schedule below. When off, syncs only happen when someone selects Run Now.
- Schedule — how often the automatic sync runs: Hourly, Daily, Weekly or Monthly. The default for a new activation is Daily.
Select Save to keep your choice. Saving the schedule never starts a sync by itself.
There is no crontab entry to add for Vulnerability Management. Syncs run as background work in SimpleRisk's queue, one platform at a time, and the queue is driven by the same cron jobs that run the rest of SimpleRisk (see the Administrator Guide for cron setup). If the queue workers aren't running, no scheduled sync starts; the symptom is "no new vulnerabilities are appearing," which can look benign but isn't. After an upgrade, the first scheduled sync runs one interval later rather than immediately.
The queue worker that runs a sync is the same one that sends SimpleRisk's email and handles its other background work. Other queued work gets its turn between platforms, not in the middle of one. A large scanner tenant can take a long time to sync, and while it does, email notifications and other queued jobs wait.
Earlier releases ignored the Automatically update from VM platforms switch and synced on the schedule you chose whether or not it was ticked. From this release the switch is honored. So that nobody's syncs stop without warning, the upgrade turns the switch on wherever the Extra is active and at least one platform is enabled. If you only ever wanted syncs on demand, turn it off after the upgrade.
The time of day changes as well. The old schedule fired at fixed times: hourly on the hour, daily at midnight, weekly at midnight on Sunday, monthly at midnight on the 1st. Now each scheduled sync starts one interval after the previous scheduled sync, or after the upgrade for the first one. The time of day therefore follows the upgrade instead of midnight, and it slips a few minutes later each cycle depending on how busy the queue is. Monthly means every 30 days, not on the 1st. If your syncs must run at a particular hour, turn the switch off and have your own scheduler call the sync API described below at that hour.
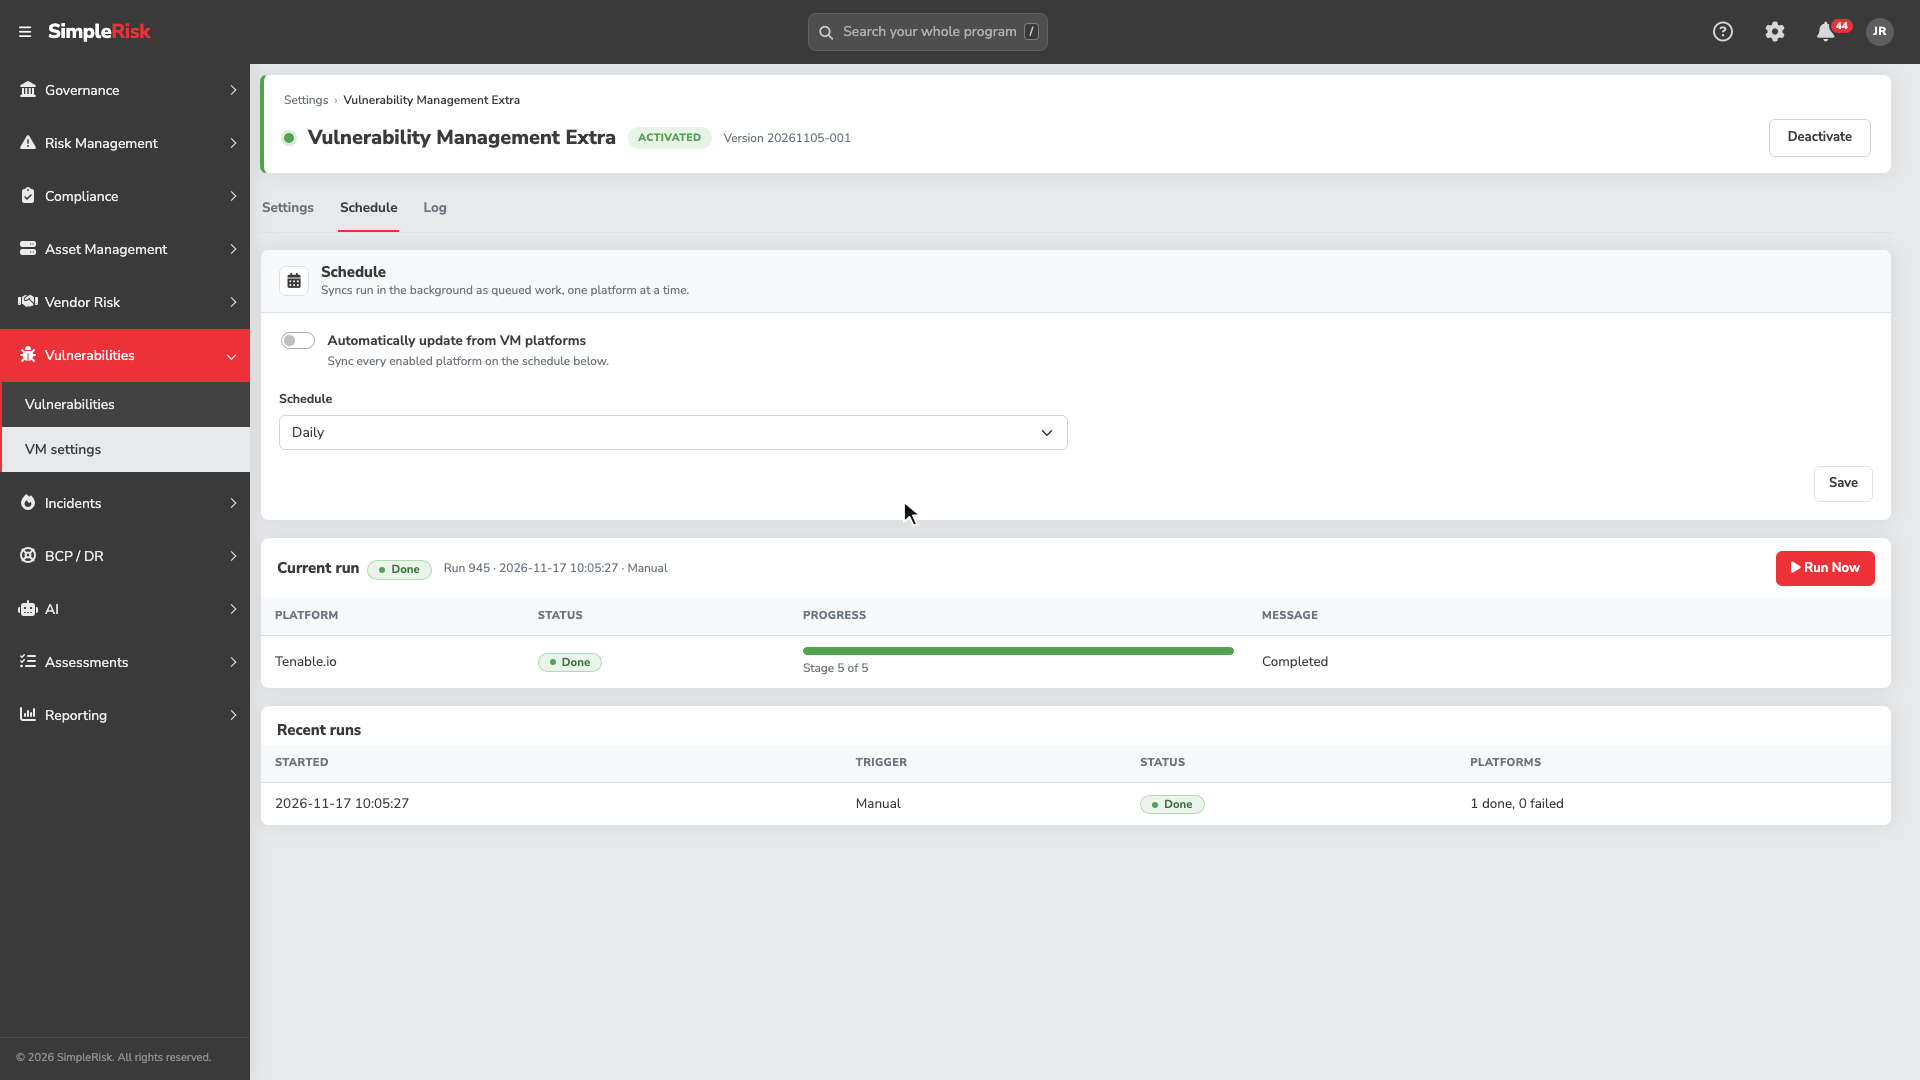
Below the form, the Current run panel shows a sync as it happens. Each enabled platform has its own row with a Status (Queued, Running, Done or Failed), a Progress reading, and the latest Message from that platform. A run as a whole can also finish as Partial when some platforms succeed and others fail. The panel updates on its own every few seconds, so you can leave it open while a large scanner works through its data.
Select Run Now to start a sync on demand, which is useful for testing a new connection or pulling data between scheduled runs. The sync is queued and the panel picks it up straight away. Only one sync can be queued or running at a time: if you select Run Now while one is active, SimpleRisk tells you so and keeps showing the active run, and if no scanner platform is enabled it asks you to select one on the Settings tab first.
The Recent runs list under the panel records each run's start time, whether it was Scheduled or Manual, its status, and how many of its platforms finished done and how many failed. The Log tab can be filtered to a single run, which is the quickest way to find out why one platform failed.
The same function is available to automation. POST /api/v2/vulnmgmt/sync-runs queues a sync and answers 202 with the run's id (409 when a run is already queued or running, 422 when no platform is enabled). GET /api/v2/vulnmgmt/sync-runs/current reports the active run, or the latest one if none is active. The older POST /api/v2/vulnmgmt/update/all still works, but it is deprecated: it is an alias of POST /api/v2/vulnmgmt/sync-runs and no longer syncs inline, so move scripts to the new path. The caller must be an administrator or hold the vm_configure permission, the same authority that reaches the scanner configuration UI.
7. Triage the synced findings
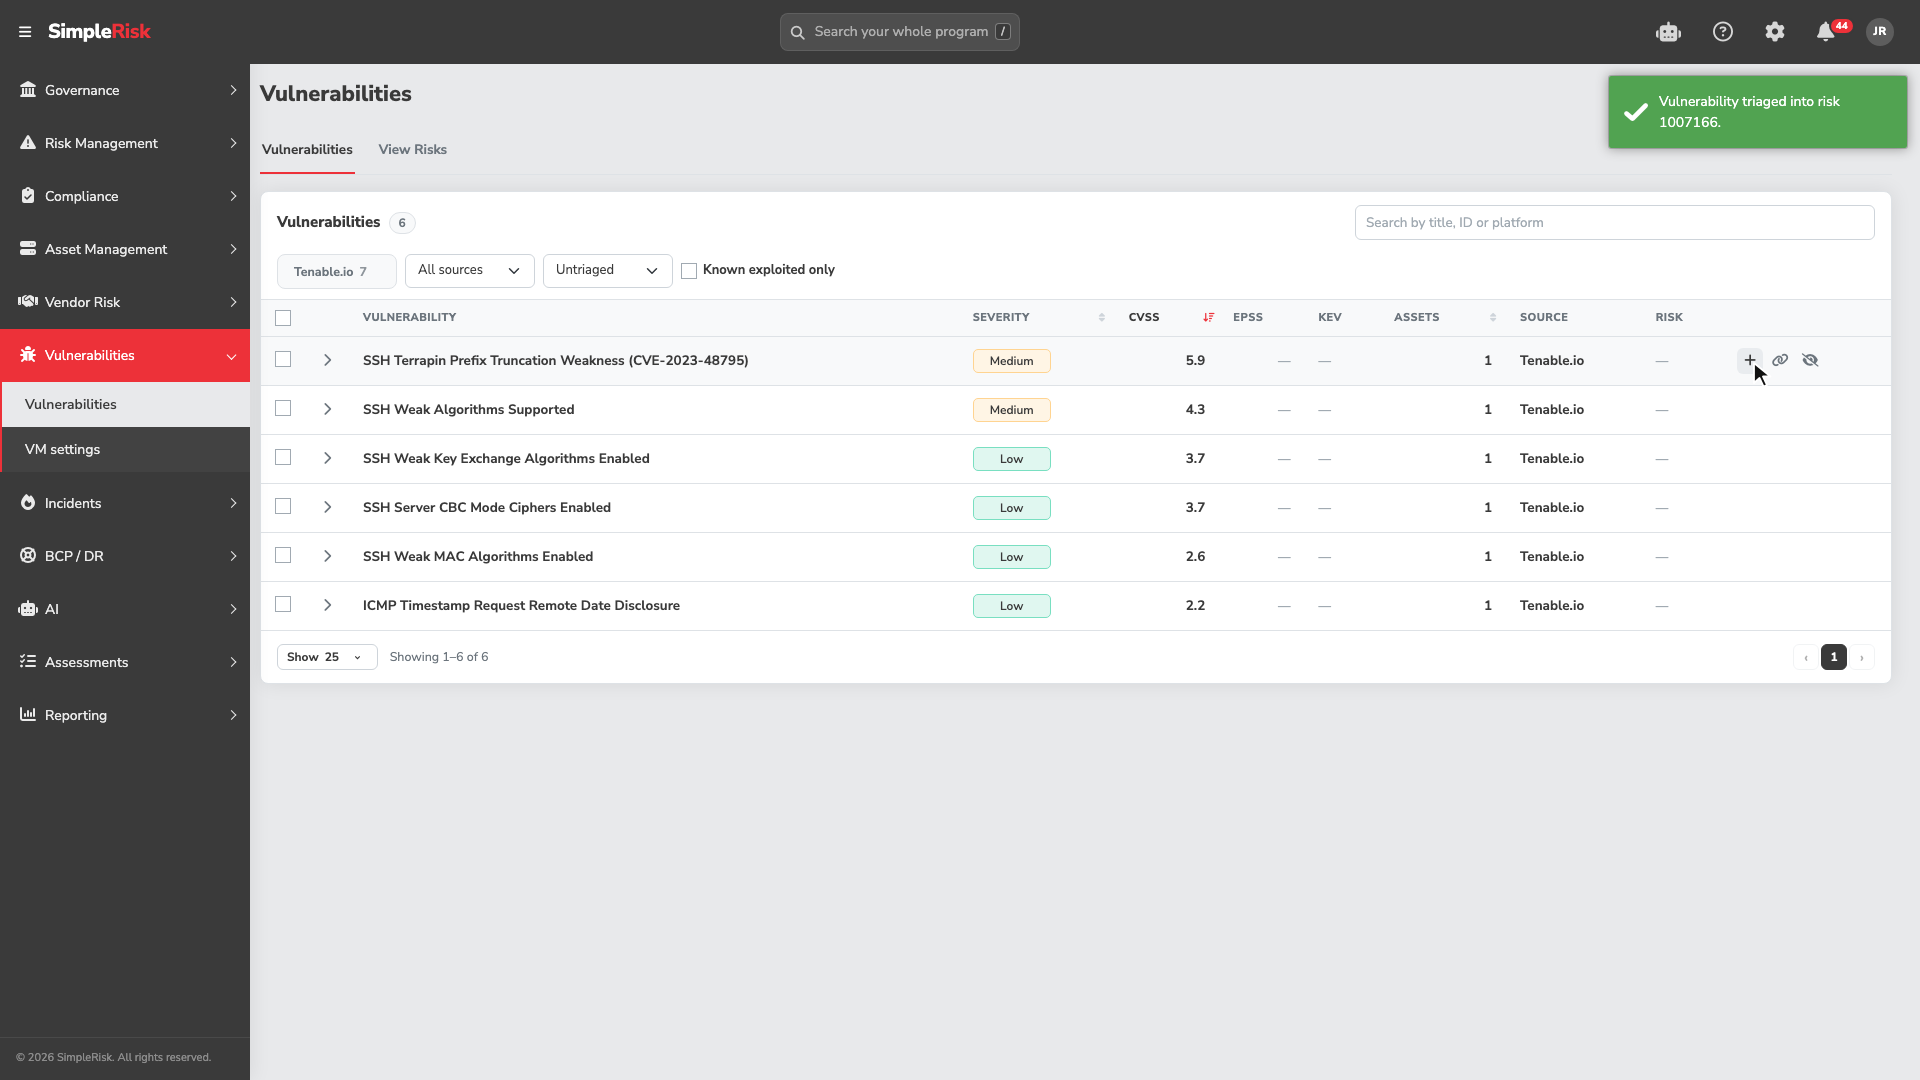
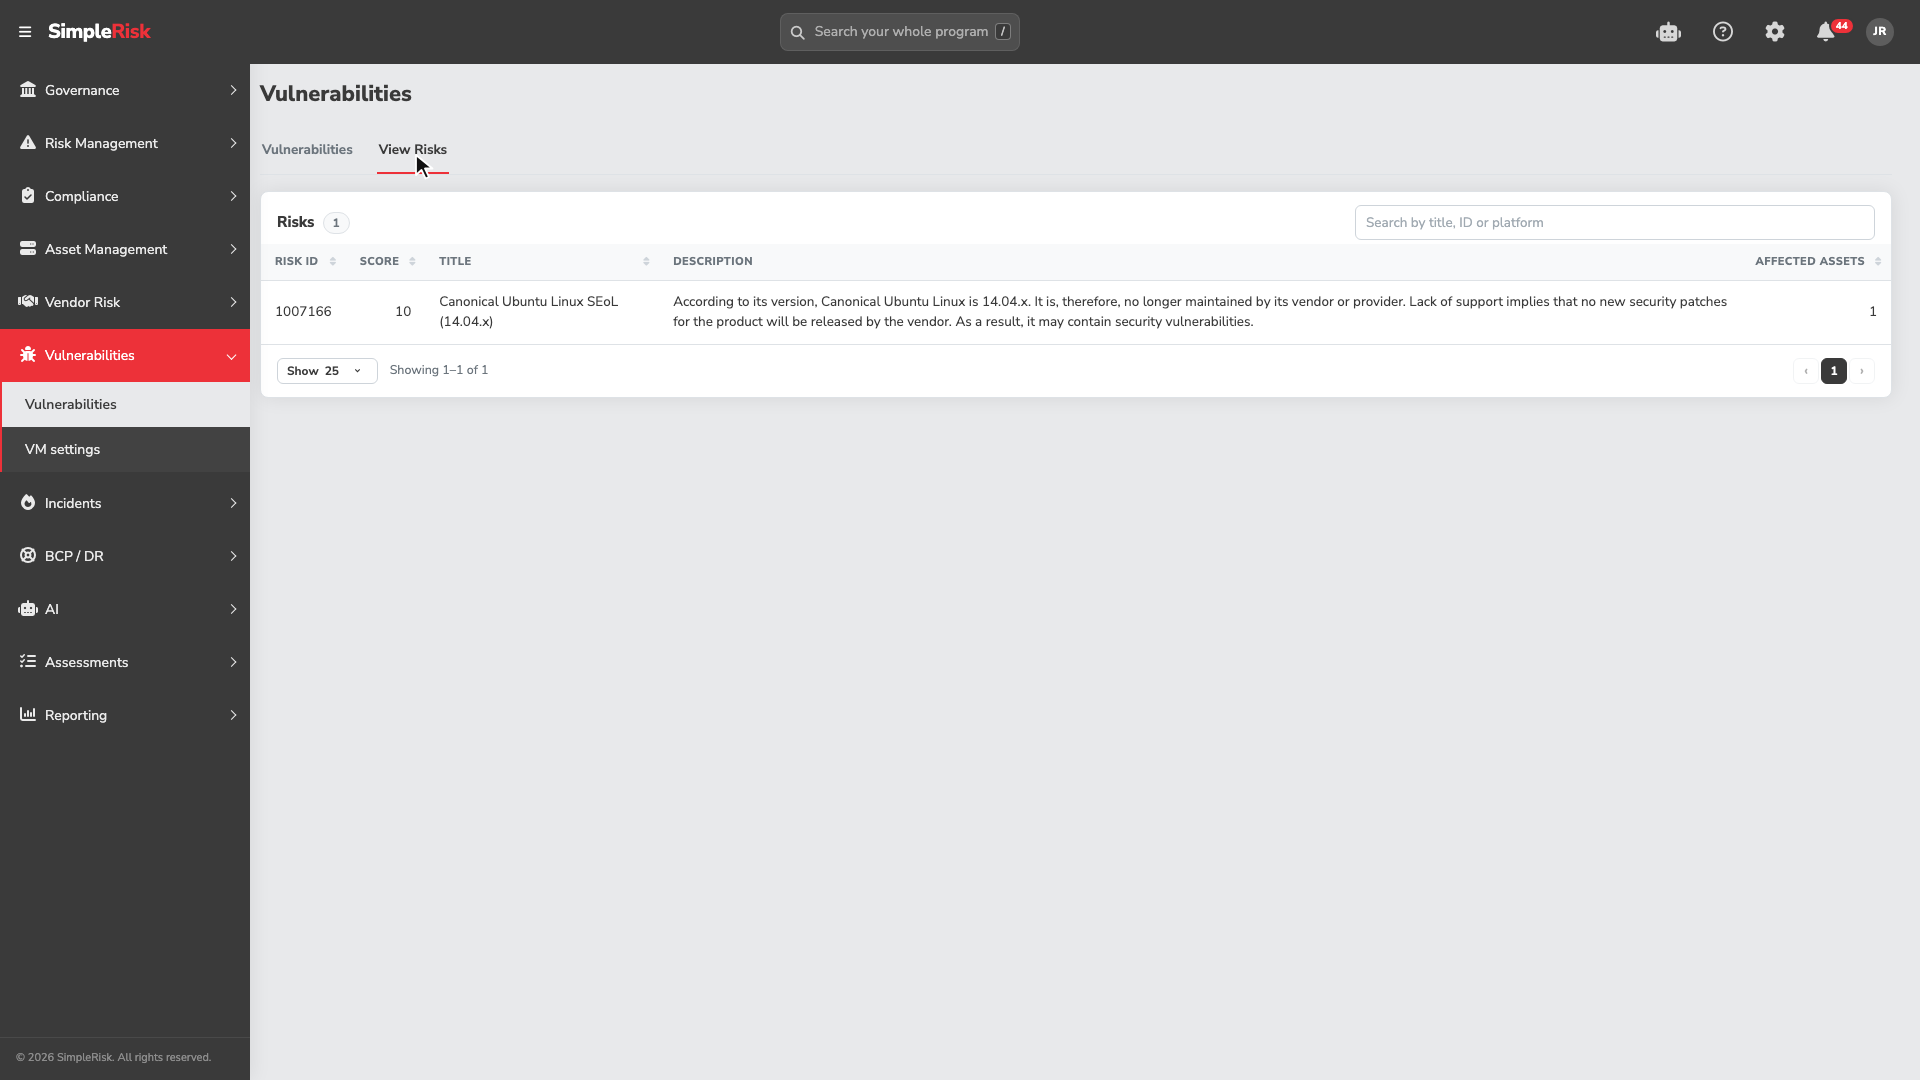
Sidebar: Vulnerabilities → Vulnerabilities. Synced findings land in the same list as imported scanner files, with the scanner's name (for example Tenable.io or Qualys) in the Source column and a source chip above the list. With the Extra active the page has two tabs: Vulnerabilities, the list itself, and View Risks, which lists the scanner findings that already have a risk, with the Risk ID of each. You need Allow Access to Vulnerability Management "Vulnerabilities" Menu to see either.
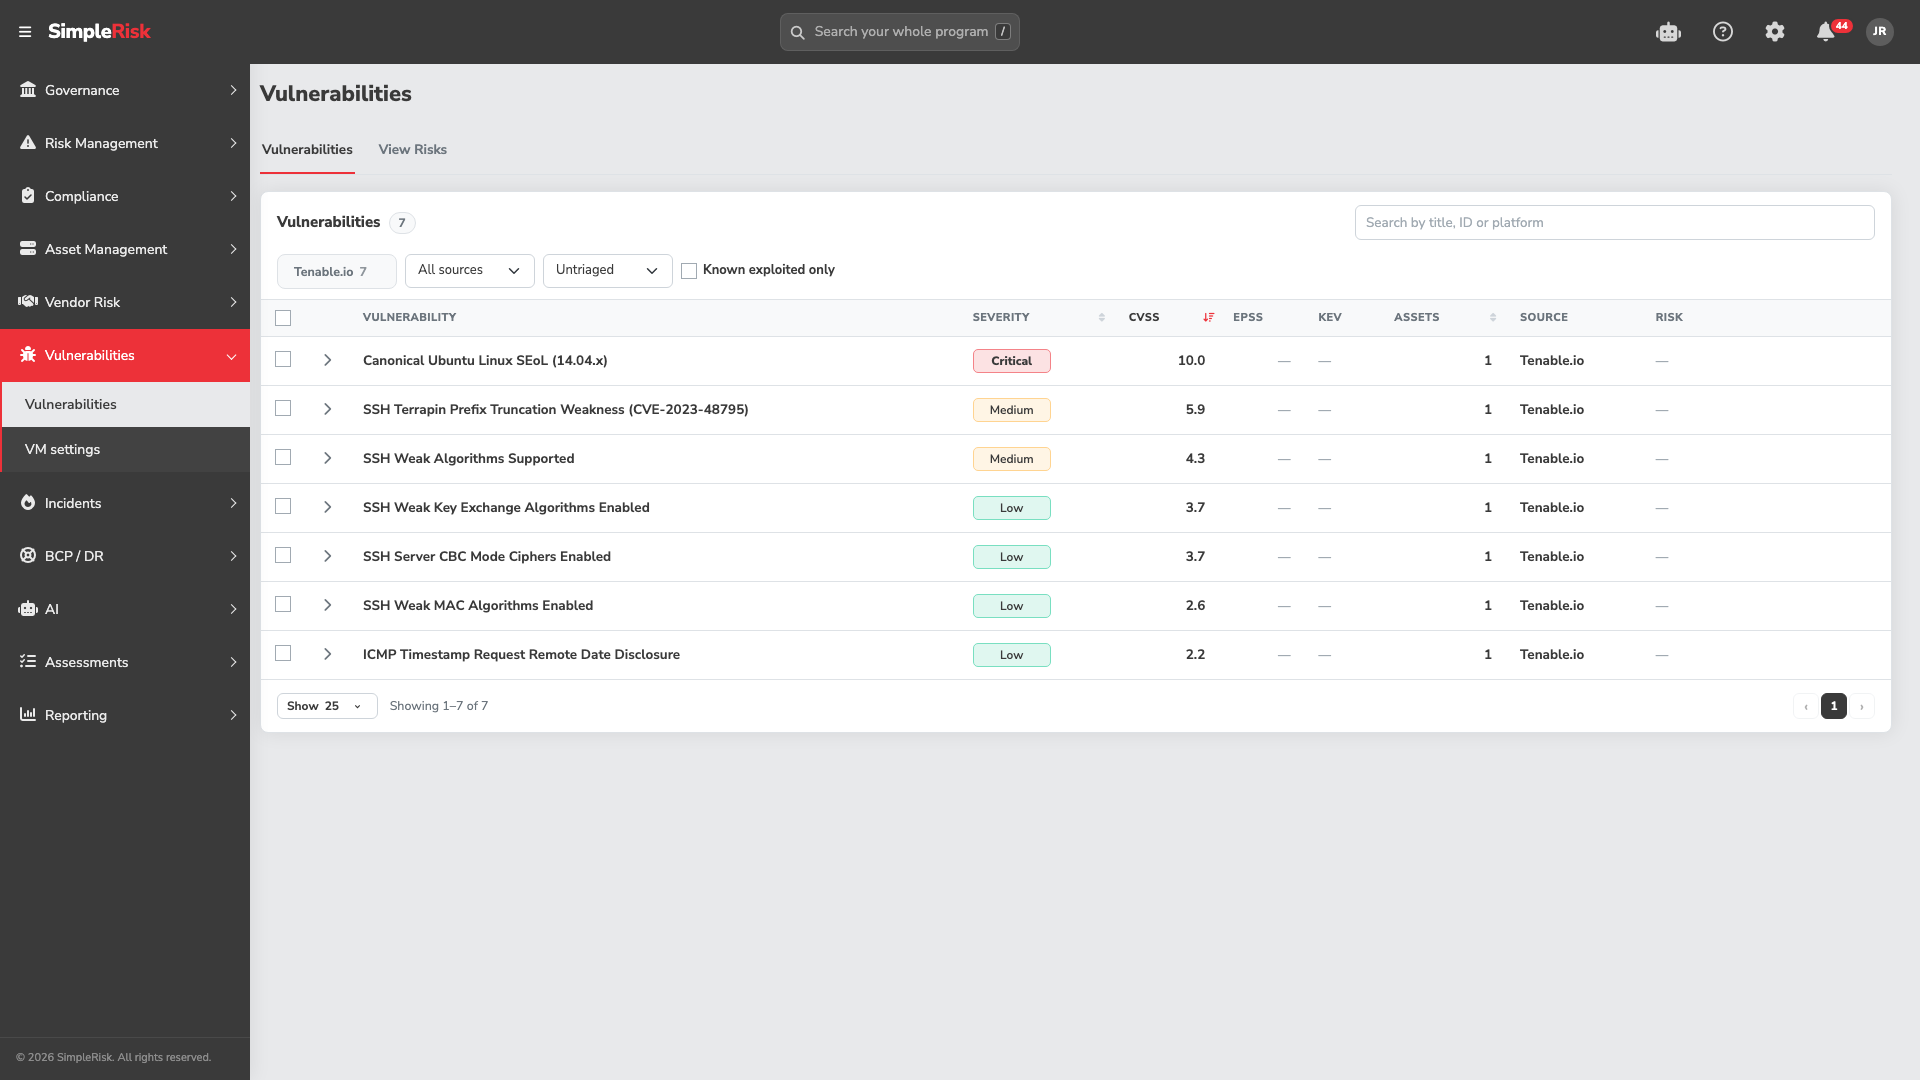
Click the arrow at the start of a row to see the assets the finding affects, with each asset's name, IP address, FQDN, operating system, and NetBIOS name.
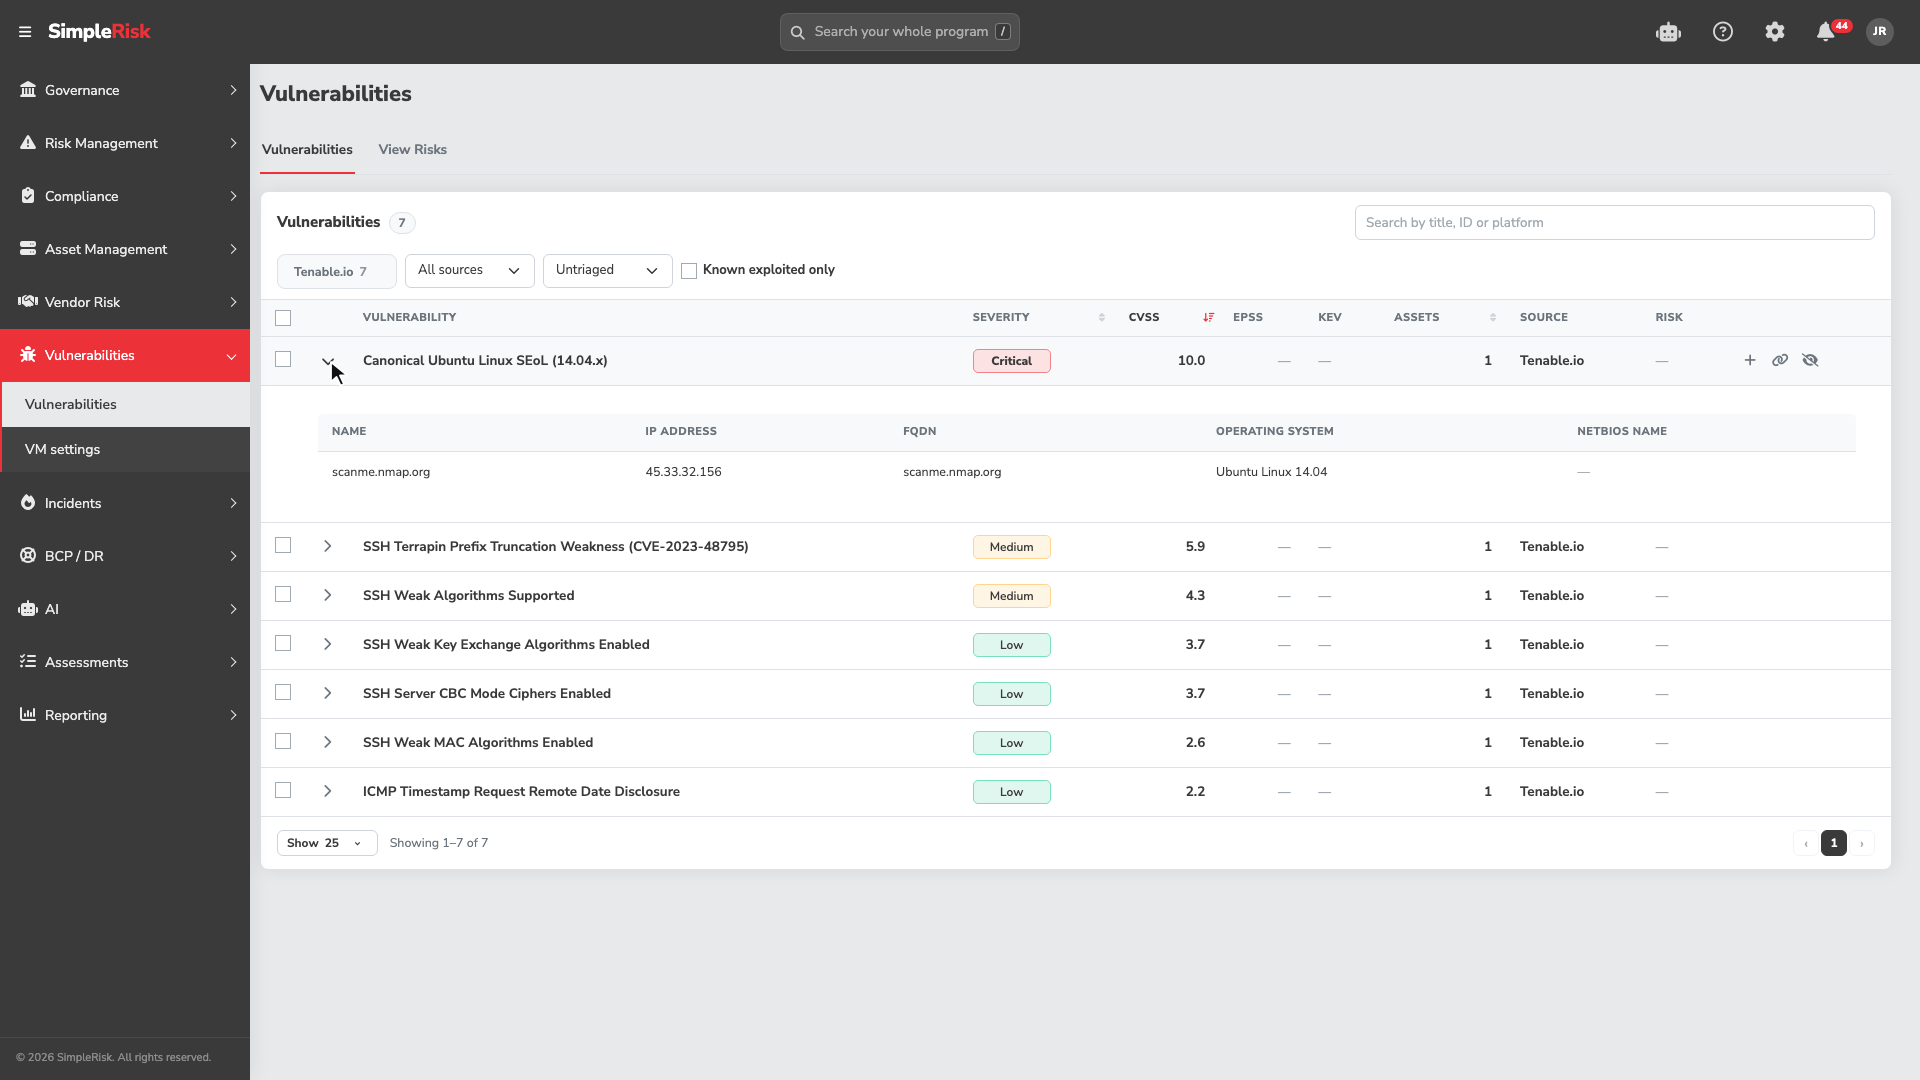
Triage works exactly as it does for imported findings: Create risk, Attach to existing risk or Hide on each row, and Create risks or Attach to existing risk for up to 50 selected rows at once. The whole walk-through is in Working the Vulnerabilities List, and what a new risk contains in From Vulnerability to Risk. Earlier releases had a separate Triage Vulnerabilities tab with Approve and Reject buttons; the shared list replaces it, and Hide is the old Reject.
Open the View Risks tab to see the risks created from scanner findings, with each one's score and number of affected assets.
Each synced finding is its own row, as the scanner reported it. Findings from different scanners are never merged, even when their titles or CVEs match, and a finding that's in an imported file as well as in a sync appears twice. Synced findings also show no EPSS score or KEV status, because the scanner tables don't carry CVE IDs to look them up by.
The list is the operational workspace; reviewing it on a recurring cadence (weekly is typical for active programs) keeps it from accumulating into a backlog nobody reads.
8. Programmatic operation via the v2 API
The Extra exposes several v2 API endpoints for automation and integration:
GET /api/v2/vulnmgmt/version— fetch the Extra version.POST /api/v2/vulnmgmt/sync-runs— queue a full sync across all enabled platforms and return202(409if a run is active,422if no platform is enabled). Requires admin orvm_configure.GET /api/v2/vulnmgmt/sync-runs/current— the active sync run, or the most recent one. Requires admin orvm_configure.GET /api/v2/vulnmgmt/sync-runs/{id}andGET /api/v2/vulnmgmt/sync-runs?limit=10— one run, or the most recent runs (newest first, up to 50). Requires admin orvm_configure.POST /api/v2/vulnmgmt/update/all— deprecated alias ofPOST /api/v2/vulnmgmt/sync-runs, kept for existing scripts.GET /api/v2/vulnerabilities— the shared list the Vulnerabilities page shows, imported and synced findings together, with paging, search, sorting and source, triage-status and known-exploited filters. Requires thevm_vulnerabilitiespermission. This endpoint is part of Core and works without the Extra.POST /api/v2/vulnerabilities/{source}/{id}/triage,POST /api/v2/vulnerabilities/triage-bulkandPOST /api/v2/vulnerabilities/{source}/{id}/hide— triage one finding into a new or existing risk, triage up to 50 at once, and hide or unhide one. They need the same permissions as the page's buttons. These are the endpoints the page uses, and the ones to build new scripts on.GET /api/v2/vulnmgmt/risks— the Extra's own list of findings that already have a risk, withsearch,order_col,order_dir,startandlengthparameters (up to 100 rows per page). It requires thevm_vulnerabilitiespermission. The earlierGET /api/v2/vulnmgmt/triagelist was removed; useGET /api/v2/vulnerabilitiesfor the findings waiting to be triaged.POST /api/v2/vulnmgmt/vulnerability/triage/add— approve and convert vulnerabilities to risks. Body specifies the vulnerability IDs and the platform.POST /api/v2/vulnmgmt/vulnerability/triage/remove— reject vulnerabilities (sets the hidden flag).- Per-platform variants such as
POST /api/v2/vulnmgmt/vulnerability/triage/tenable/addfor platform-scoped operations.
The most common automation pattern is a script that pulls the untriaged list from GET /api/v2/vulnerabilities, filters it to the team's own rules, and posts triage requests for the matches. The full request and response shapes are in the API documentation at /api/v2/documentation/.
Common pitfalls
A handful of patterns recur with the Extra.
-
Auto-triage threshold too low. Setting
extra_vulnmgmt_triage_vulnerabilities_by_score_valueto 6.0 or 7.0 produces a risk register dominated by routine Medium- and High-severity findings the team would have rejected on manual review. Set the auto-triage high (9.0+) so the auto-promoted findings are unambiguously the worst-of-the-worst; leave the rest for human review. -
Being surprised by the first sync after an upgrade. The thresholds now compare each finding's newest CVSS base score instead of its v2 score. Newer scores usually run higher for the same flaw, so many findings that earlier releases left below your thresholds now pass them: findings that have both a v2 and a v3 score, not only those scored solely under v3. A few move the other way. A finding whose newest score is lower than its v2 score, or a Qualys finding whose CVSS score is lower than severity × 2, can now miss a threshold it used to meet. The first sync after the upgrade can therefore import a large batch of new findings, and with auto-triage on it can promote many of them straight into the risk register. If the Jira Extra is configured, each new risk also opens a Jira issue. Check both thresholds before that sync runs, and consider turning auto-triage off for the first cycle so you can see the volume before it lands.
-
Import threshold too low or off. Importing every CVSS 0.0+ Informational finding produces a vulnerability database with thousands of low-value rows that slow down the queue rendering and obscure the meaningful findings. For high-volume scanners, set the import threshold at CVSS 4.0+ (Medium and above) or higher; the suppressed findings stay in the scanner's own console where they belong.
-
Triage queue that never gets worked. A growing queue with no reviewers actively triaging produces a backlog where the operationally-significant findings get buried in routine ones. Schedule a recurring triage session (weekly is reasonable); the discipline of clearing the queue is what makes the Extra useful rather than just a data-collection layer.
-
Configured-and-forgotten scanner integrations. Scanner credentials expire. API endpoints change. Site definitions get reorganized. When a scanner sync starts failing, the symptom is silence (no new vulnerabilities appearing) which can look like good news. Watch the Extra's sync log for failures; a failed sync is an incident that hides itself if nobody surfaces it.
-
Disabling SSL certificate check in production. Setting
extra_vulnmgmt_ssl_certificate_checkto off accepts whatever TLS certificate the scanner presents, including invalid or attacker-substituted ones. The setting exists for development and testing; turning it off in production is a security regression. If your scanner has a self-signed cert in production, fix the cert. -
Treating hide as delete. Hiding a vulnerability takes it out of the Untriaged view; it doesn't delete it. The next sync won't bring a hidden vulnerability back (the hidden flag persists), and the detail (affected assets, CVSS, description) stays. Hide confidently: set Triage status to Hidden and use Unhide if you change your mind.
-
Letting the auto-triage produce risks the team doesn't notice. Auto-promoted risks land in the risk register without a human-decision moment. A program with auto-triage on at 9.0+ will produce 9.0+ risks the team only notices when the next risk dashboard review happens. For programs that need a human-decision moment on every promotion, leave auto-triage off and triage by hand from the Vulnerabilities list.
-
Expecting one row per vulnerability across scanners. The list shows each synced finding as its own row. Findings are never merged across scanners, or between a sync and an imported file, even when the title or CVE is the same. Triage one of them and attach the others to the same risk, so the register ends up with one risk carrying every affected asset.
-
Skipping the asset import. Turning
extra_vulnmgmt_import_assetsoff leaves vulnerability records with asset references that don't resolve to SimpleRisk asset rows. The asset-linkage on the promoted risks is then incomplete, and asset-by-risk reporting won't surface vulnerability-derived risks against the correct assets. Most programs should leave this setting on. -
Multiple scanners producing duplicate findings without coordination. Running Tenable and Qualys against the same environment will surface most of the same vulnerabilities through both pipelines, with slightly different CVSS scores and descriptions. The list never merges them, so both findings appear. The fix is operational: pick one scanner as the primary source for each population of assets and limit the other scanners to populations the primary doesn't cover.